Utilizing Azure Access Tiers in VIDIZMO
Storage providers offer the capability to store your Portal content and determine how it is managed. You can also set up multiple storage providers for your VIDIZMO Portal and specify which content types can be stored within each storage in their respective configurations.
You can configure Azure blobs as your Portal's storage provider. If your Blob storage supports access tiers, then you can utilize various functionalities to store your Portal content in these tiers. This lets you reduce storage costs and access costs by allowing you to keep content tiers based on how frequently they are accessed. If required, you can selectively change the access tiers of your content using various functionalities.
VIDIZMO supports Azure blob storage as the storage type for your Portal. Your Azure account type determines the availability of access tiers for your blob storage. According to Azure, tiering is supported by Standard General Purpose V2 accounts (GPv2) and Blob Storage.
VIDIZMO supports blobs from both Premium Storage and General Purpose V1 (GPv1) accounts. However, these blobs do not support tiering by default, meaning you can't use access tiers on your Portal. You can use the Azure Pricing Calculator to determine which Azure accounts support tiering.
Prerequisites
- Ensure you belong to a group that has Content Lifecycle Policy feature permissions enabled. See Enable Features in the VIDIZMO Portal for more information.
- Ensure you configure an Azure blob storage that supports access tiers as your Portal's storage provider.
- For On-Premises deployment, see How to Configure Azure Storage with VIDIZMO On-Premise Encoder.
- For SaaS or Cloud deployment, see How to Configure Azure Storage with VIDIZMO Cloud Encoder.
Tier Settings in Azure Storage
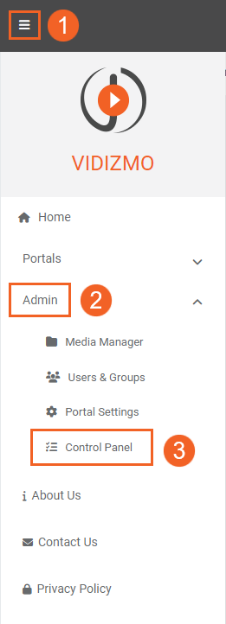
- Open the navigation pane using the button at the top left.
- Click the 'Admin' dropdown.
- Click 'Control Panel.'
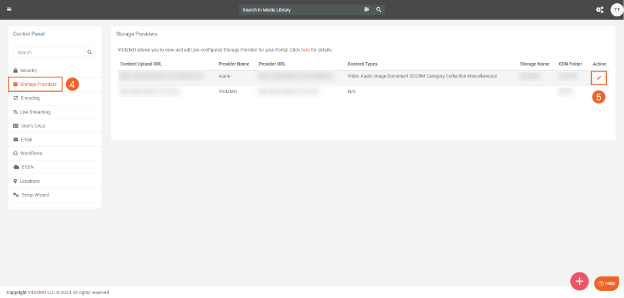
- In the Control Panel, click 'Storage Provider.'
- Find your Azure storage using the 'Provider Name,' then click the edit button under 'Action' for its configurations.
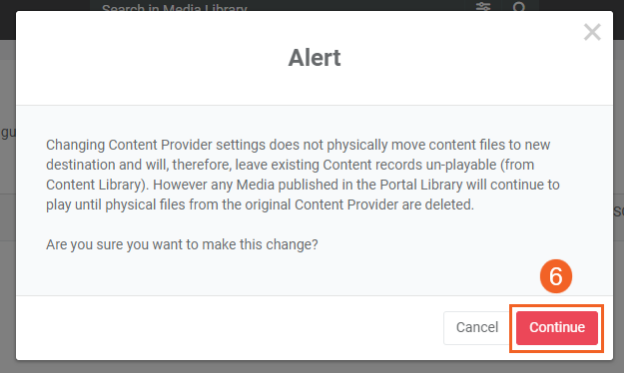
- Click 'Continue' after reading the 'Alert.'
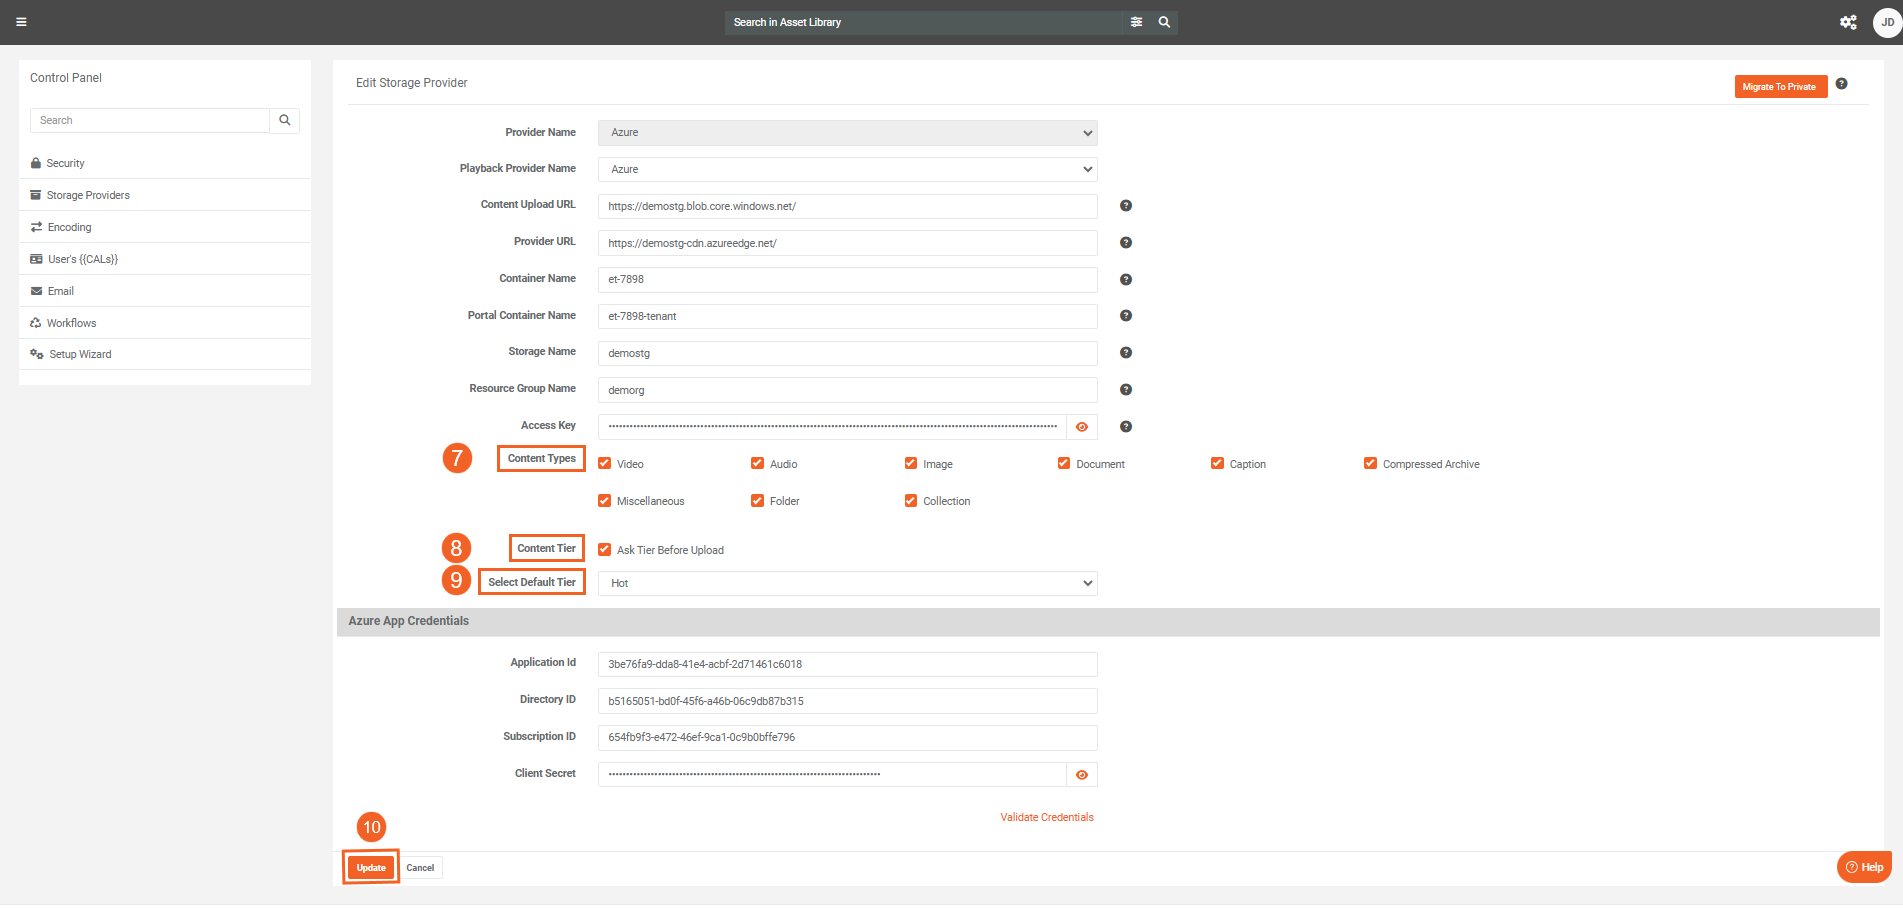
- Select the content types you want to store in access tiers and perform the change tier operations on.
- Select the checkbox to enable the options to select access tiers whenever the content is uploaded or added to your Portal. Unchecking this option will cause all uploaded or created content to go into the selected default tier.
Note: There are alternative methods for uploading content to your Portal that do not require user input for selecting an access tier. One example of this is content ingestion. In these instances, the uploaded content goes into the default tier.
- Select the default access tier for content uploaded or added to your Portal.
- Click the 'Update' button to save your configurations.
Upload to Access Tier
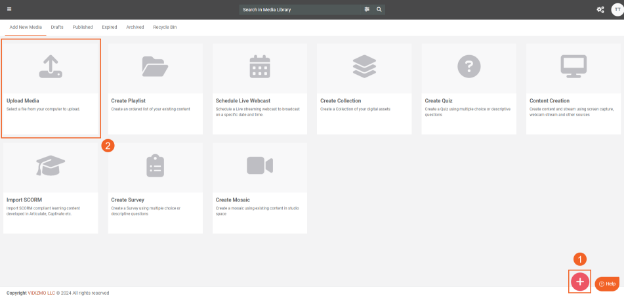
When 'Ask Tier Before Upload' is selected in your Azure storage provider's settings, you can upload content to your desired access tier.
-
Click the 'Add Media' button.
-
Select 'Upload Media.'
-
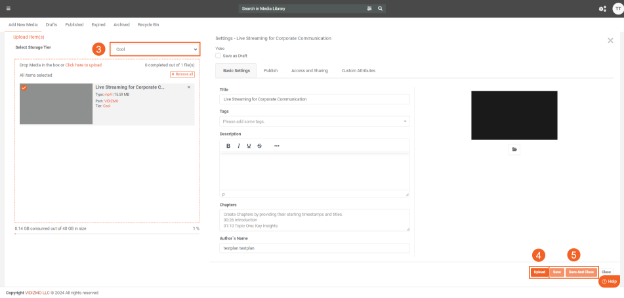
Select the access tier to upload your content into.
-
Click the 'Upload' button to begin the upload.
-
Click 'Save' or 'Save and Close' to finish the upload settings.
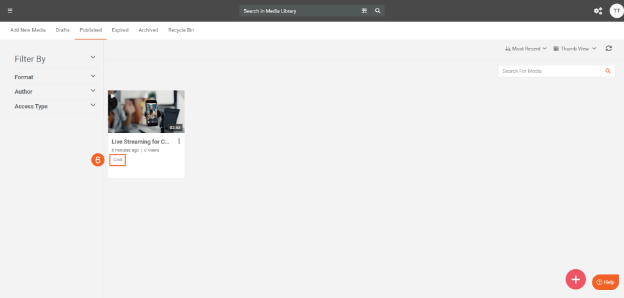
- View the uploaded content in your Portal's library. It will have a tag that indicates its Azure access tier.
Note: Content in the Hot tier do not have a tag
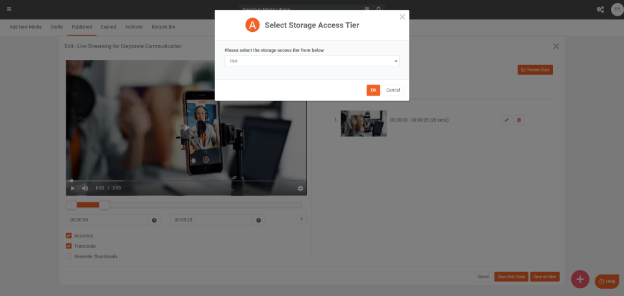
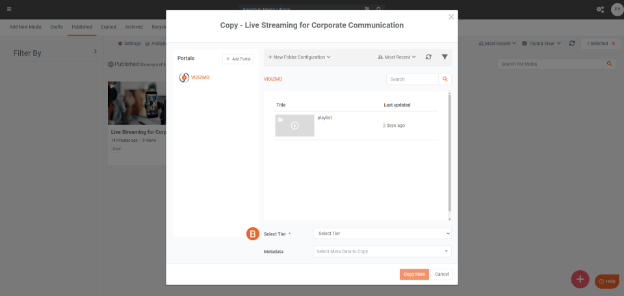
- The options to select access tier also appear in other instances where new content is created on your Portal. Two examples of this are when you're:
Creating a Clip
Creating a Copy
Change Tier Settings
You must enable the 'Tenant Policy Workflow' to perform change tier operations on your Portal through content lifecycle policies or on-demand selection.
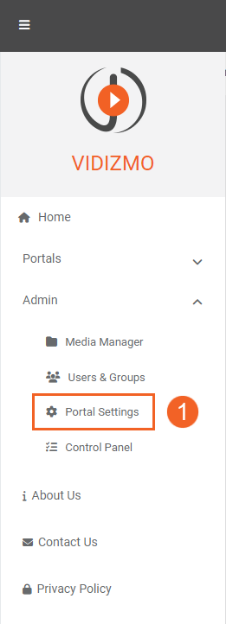
- Select ‘Portal Settings’ on the navigation pane.
-
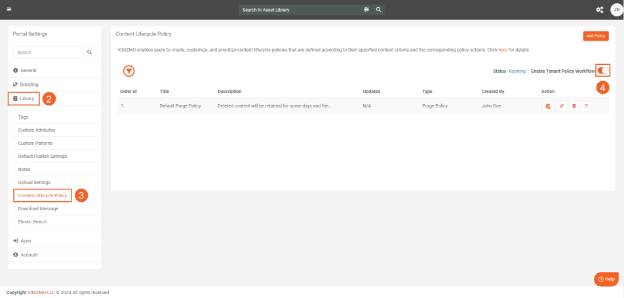
Click 'Library.'
-
Select 'Content Lifecycle Policy.'
-
Enable the 'Tenant Policy Workflow' via the toggle.
Changing Access Tier
-
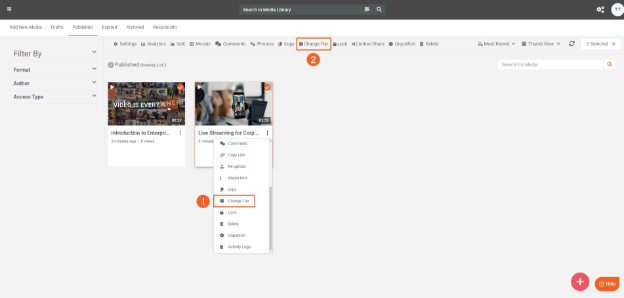
Select 'Change Tier' from the overflow menu of the Portal content to change its access tier.
-
You can also change the tier of multiple items by selecting them and then selecting 'Change tier' on the bulk menu.
-
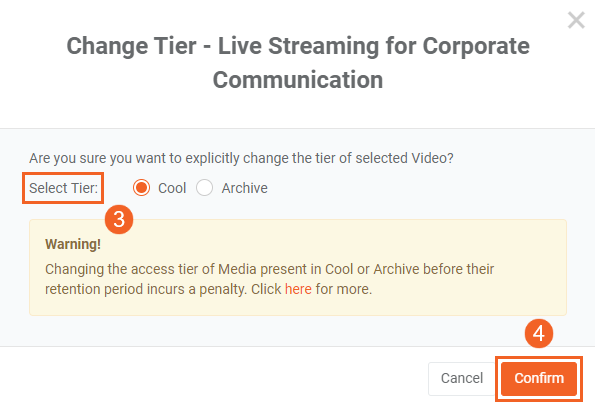
Select the tier you want to move your content into. The options here vary according to the selected content's current access tier.
-
Click Confirm to proceed.
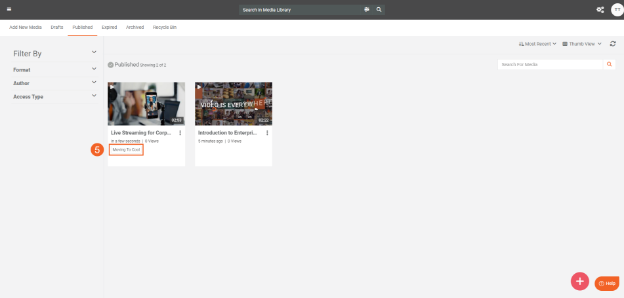
- The access tier tag will be updated to reflect the movement of the content into the selected tier.
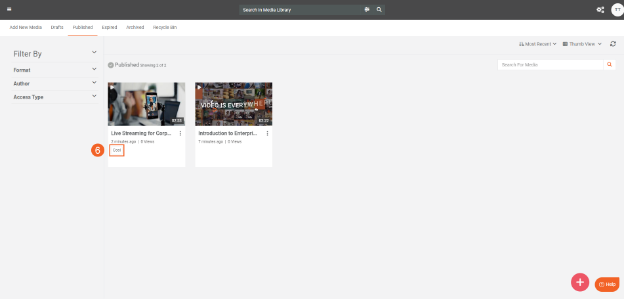
- Once the content is moved to the chosen access tier, the tag will be updated to indicate its new tier.
-
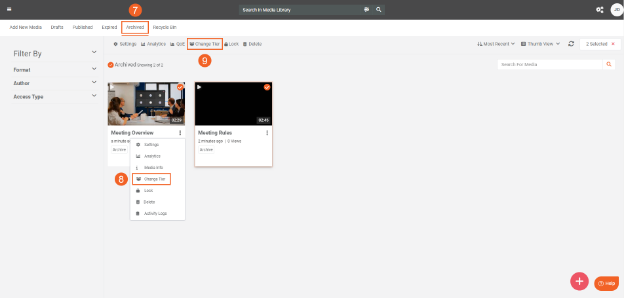
The content in the Archive tier is located in the 'Archived' tab of your Portal. It also has an 'Archive' tag.
-
You can manually unarchive and rehydrate Portal content present here from its overflow menu.
-
If you want to unarchive items in bulk, select them and select ‘Change Tier’ on the bulk action menu.
-
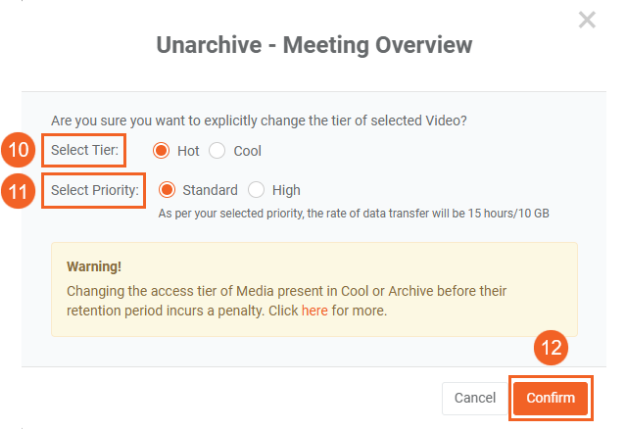
Select the access tier you want to move your unarchived content to
-
Select the rehydration priority to be used. See Understanding Content Lifecycle Policies in VIDIZMO.docx for more.
-
Click confirm to initiate the rehydration process.
You can also utilize content lifecycle policies to change access tiers of content. See How to Create and Manage Content Lifecycle Policies.docx for more.
Content Migration Scenarios
Migration enables you to transfer your Portal content between different storage providers. When migrating content to or from Azure storage that supports tiering, the storage method may vary based on specific scenarios. The table below uses example scenarios to illustrate how VIDIZMO handles the storage of your content during the migration process.
| Scenario | Source | Destination | Post-Migration Result |
|---|---|---|---|
| Migrating content from Azure storage (Supports Tiering) to Azure storage (Supports Tiering) | Azure blob (Tiering) | Azure blob (Tiering) | Content retains the access tiers. |
| Migrating content from Azure storage (No Tiering) to Azure storage (Supports Tiering) | Azure blob (No Tiering) | Azure blob (Tiering) | Content goes to the default access tier of the destination storage. |
| Migrating content from Azure storage (Supports Tiering) to Azure storage (No Tiering) | Azure blob (Tiering) | Azure blob (No Tiering) | Content goes to the default tier of the destination storage. (Usually Hot) |
| Migrating content from VIDIZMO or local storage to Azure storage (Supports Tiering) | Local Storage | Azure blob (Tiering) | Content goes to the default access tier of the destination storage. |
| Migrating content from Azure storage (Supports Tiering) to VIDIZMO or local storage. | Azure blob (Tiering) | Local Storage | Content is stored on the local storage that does not have a tier. |
| Migrating content from Azure storage (Supports Tiering) to Wowza or AWS storage. | Azure blob (Tiering) | AWS S3 Bucket | Content goes to the single tier of the destination storage. (Usually Hot) |
| Migrating content from Wowza or AWS storage to Azure storage (Supports Tiering) | AWS S3 Bucket | Azure blob (Tiering) | Content goes to the default access tier of the destination storage |
Read more about migration here: Migrate Content Between Storage Providers in VIDIZMO.